Introduction
HVML is the acronym of Hybrid Virtual Markup Language. It is a general-purpose and easy-to-learn programming language proposed and designed by Vincent Wei, who is the author of the China-first open source project MiniGUI.
Vincent Wei says that HVML is a programmable markup language with new structure, new principles, and new design patterns. It is definitely unlike any programming language you are familiar with:
- It uses markups to define the program structure and the control flow; this greatly improves the readability of the program.
- It uses the extended JSON with dynamic capabilities to define the data; this makes it ideal as a glue to bond different system components.
- It introduces the data driven programming model; this allows developers to focus more on data generation and processing, rather than the control flow.
- It is dynamic; developers can not only fetch data, templates, HVML fragments from a remote data source, but also delete an exisiting variable.
- It provides a unique way to support coroutines, threads, closures, ..., which are those features you saw in modern programming languages.
- It is flexible; developers can use HVML to write simple scripting tools, or they can use it to develop complex GUI applications.
- It is fast; HVML uses a simple and effecient stack-based virtual machine, and it does not use any garbage collector.
- It provides a higher level of abstraction than other scripting languages, so we can do more with less code.
In this tutorial, we will show you the most exciting features of HVML, especially those features that are different from common programming languages. If you are familiar with a programming language such as C/C++, Python, or JavaScript, you will find that you can master the basic principles and methods of HVML programming in a very short time, say, in 30 minutes.
Let's enjoy it.
Fundamental Principles
As said before, HVML is a programmable markup language. You know that HTML uses markups to define a static document and the text contents in a document, while HVML uses markups to define a program structure and the data. In other words, HTML is static, while HVML is programmable and dynamic.
For example, the following HTML file defines a document with a paragraph which contains Hello, world!:
<html>
    <body>
        <p>Hello, world!</p>
    </body>
</html>
If you change all occurrences of html to hvml in the above HTML file, and add a new attribute target="html" to the root element, you will get your first HVML program:
<hvml target="html">
    <body>
        <p>Hello, world!</p>
    </body>
</hvml>
Like a Python, PHP, or JavaScript script, we need an interperter to run this HVML program. From the HVML interpreter's perspective, each element in an HVML program defines an operation to perform. You know that a valid HTML document defines a DOM (Document Object Model) tree, and a web browser can render the DOM tree in a window. Similarly, a valid HVML program also defines a DOM tree, and the interpreter executes the DOM tree. In other words, a browser renders an HTML document, while an HVML interprerter executes an HVML program.
The interpreter executes the DOM tree from the root element, i.e., the hvml element, in depth-first order. When executing the hvml element, because the target attribute has the value html, the interperter will generate an HTML document. In terms of HVML, this HTML document is called the target document. After executed the hvml element, the iterperter continues to execute the body element and the p element in sequence. After the interpreter executed the p element, because there is no any element in the DOM tree, the interpreter will stop to execute the DOM tree.
The interpreter performs every element according to the tag name, the attributes, and the content. The tag name defines the operation to perform, and the attributes and the contents defines the arguments when performing the operation. For ease of understanding, you can think of an HVML element as a function and the attributes and the contents as the arguments passed to it when calling the function.
HVML introduces about 20 tags for different operations:
hvml,head, andbodyare calledframe tags; they are used to define the frame of an HVML program.archetype,achedata,error, andexceptare calledtemplate tags; they are used to define parameterized templates.init,test,iterate,define,call,include,load,exit,return,update,back, and other tags use verbs are calledverb tags, they are used to define an action to manipulate a data, update the target document, or control the virtual machine.
Tags other than the above tags are called foreign tags. For an element defined by a foreign tag, HVML assigns a default and uniform operation: Evaluting the attribute values and the contents, then copying them to the target document.
You may have a question: what if a foreign tag name conflicts with an HVML tag name? The answer is using a prefix for foreign tags.
In the head of an HVML program, there can be an optional DOCTYPE node to define the document type and the prefix to use for foreign tags:
<!DOCTYPE hvml SYSTEM "f:">
In this way, any tag with the prefix f: will be treated as a foreign tag. For example:
<!DOCTYPE hvml SYSTEM "f:">

<hvml target="html">
    <body>
        <f:error>Hello, world!</f:error>
    </body>
</hvml>
In the above code, we use the prefix f: for an error element. As mentioned before, error is a template tag defined by HVML. When you need to refer to a foreign element which has the same tag name as HVML, you use the prefix.
Fortunately, we don't need to use this prefix in most cases, because HVML's tag names are significantly different from ones defined by HTML.
For your first HVML program, the interpreter will generate an empty HTML document, and copy the contents of p elements to the body of the target HTML document. As a result, the HVML program generates an HTML document, which is same as the HTML file given earlier.
Note that, the body tag is not a foreign tag, it is a frame tag of HVML. It is used to define an entrance body of an HVML program. In deed, you can define multiple body elements in an HVML program, and tell the interpreter to use a specific body as the entrance.
HVML also uses head tag to define an operation group to execute for any body entrance. This can be used to initialize some global data for each body entrance.
The great thing about HVML is that, you can use markups to define a program which may have a complex control flow. You can also use flexible expressions to generate dynamic contents for your target document.
Preparation
Before looking deeply the principles of HVML, let's build a practice environment first. If you have built the environment, you can skip this section.
The HVML community has released an open source HVML interperter called PurC. Please refer to the public repository of PurC for the detailed instructions to build and install it:
Assuming that you have installed PurC to your system, you can save the contents of your first HVML program to a file named hello-world.hvml:
<hvml target="html">
    <body>
        <p>Hello, world!</p>
    </body>
</hvml>
and run the HVML program by using the following command:
$ purc -b hello-world.hvml
The command line above will give you the following text:
purc 0.8.0
Copyright (C) 2022 FMSoft Technologies.
License GPLv3+: GNU GPL version 3 or later <http://gnu.org/licenses/gpl.html>
This is free software: you are free to change and redistribute it.
There is NO WARRANTY, to the extent permitted by law.

Executing HVML program from `file:///srv/devel/hvml/purc/build/hello-world.hvml`...

>> The document generated:
<html>
  <head>
  </head>
  <body>
    <p>
      Hello, world!
    </p>
  </body>
</html>


>> The executed result:
null
You saw that this program generated an HTML document, which is same as the one we talked earlier.
On a Unix-like operating system, you can execute your first HVML program directly from a command line. To do this, add the following line as the first line of your first HVML program:
#!/usr/local/bin/purc -b
And make the file to have executing permission, then try to run the program:
$ chmod +x hello-world.hvml
$ ./hello-world.hvml
You will get the same result as before.
Target Document Types and Expressions
When you reach here, you may have a new question: Does an HVML program have to generate an HTML document? The answer is NO.
In fact, HVML supports multiple document types:
void: all foreign elements will be ignored.html: generating an HTML document.xml: generating an XML document (not supported by PurC so far).plain: only the text contents will be kept as plain text (not supported by PurC so far).
So if you change the value of target of the hvml element to void, the HVML program will generate a void document, that is, all foreign elements in the HVML programs will be ignored.
<hvml target="void">
    <body>
        <p>Hello, world!</p>
    </body>
</hvml>
If you save the revised version to hello-world-void.hvml and run it by using purc, you will get the following output:
$ purc -b hello-world-void.hvml
purc 0.8.0
Copyright (C) 2022 FMSoft Technologies.
License GPLv3+: GNU GPL version 3 or later <http://gnu.org/licenses/gpl.html>
This is free software: you are free to change and redistribute it.
There is NO WARRANTY, to the extent permitted by law.

Executing HVML program from `file:///srv/devel/hvml/purc/build/hvml/hello-world-0.hvml`...

>> The document generated:


>> The executed result:
null
Moreover, if you run the HVML program without the flag -b, you will get nothing:
$ purc hello-world.hvml
$
The flag -b (or the corresponding long option --verbose) tells the interpreter to print verbose information when executing a program. The HVML program generates an HTML document, but does not do anything to output information to your terminal. Therefore, if you run purc without the -b flag, you will see nothing.
So, if you want to print some text to the terminal, how to program in HVML?
You can revise your first HVML program as follow:
<!-- Version 1 -->
<hvml target="html">

    $STREAM.stdout.writelines('Hello, world!')

    <body>
        <p>Hello, world!</p>
    </body>
</hvml>
We call the initial version of the first HVML program as Version 0, and this revised version as Version 1. When you use purc to run Version 1, you will get the following output:
$ purc hello-world.hvml
Hello, world!
Obviously, the newly added statement $STREAM.stdout.writelines('Hello, world!') outputs Hello, world! to your terminal.
Furthermore, if you execute the HVML program with the flag -b:
$ purc -b hello-world.hvml
purc 0.8.0
Copyright (C) 2022 FMSoft Technologies.
License GPLv3+: GNU GPL version 3 or later <http://gnu.org/licenses/gpl.html>
This is free software: you are free to change and redistribute it.
There is NO WARRANTY, to the extent permitted by law.

Executing HVML program from `file:///srv/devel/hvml/purc/build/hello-world.hvml`...
Hello, world!

>> The document generated:
<html>
  <head>
  </head>
  <body>
    <p>
      Hello, world!
    </p>
  </body>
</html>


>> The executed result:
14
Comparing this output with the output of Version 0, you will find that the later shows an executed result 14 instead of null.
The statement like $STREAM.stdout.writelines('Hello, world!') is an EJSON expression in HVML. We can use an EJSON expression to access a property of an object, or call a method of an object. Every expression will have an evaluated result, and the result can be used to define the attribute values or contents of an element. Note that, even if you set the type of the target document is void, the attribute values or the contents of a foreign element will still be evaluated during execution.
Let's take a closer look at the components in the expression.
$STREAM refers to an object named STREAM. That is, STREAM is a variable, HVML uses $ as the prefix when referring a variable. Because we can embed an EJSON expresion in a string, HVML uses $ to distinguish an EJSON expression with other literal text in a string. As a convention, one variable like STREAM which are uppercase is a predefined variable. You can use the predefined variables to access the system functions or perform common tasks. Currently, HVML defines the following predefined variables:
SYS: You can useSYSto get or set information about your system. For example, the current locale, time, working directory, and so on.STR: You can useSTRto manipulate strings. For example, concatenate multiple strings or extract a substring, and so on.STREAM: You can useSTREAMto open a stream and read/write data from/to the stream.MATH: As the name suggests, you can useMATHto perform the mathematical calculation based on floating point numbers.FSandFILE: You can useFSandFILEto perform operations on file systems and files.EJSON: You can useEJSONto convert among various data types.L: You can useLto perform the logical operations based on one or more data.DATETIME: You can useDATETIMEto perform operations based on date and time.URL: You can useURLto perform operations based on URL and queries.
Per the expression $STREAM.stdout.writelines('Hello, world!'), it calls the method writelines on stdout object of the predefined variable STREAM. The method writelines prints the Hello, world! on your terminal, and returns the bytes wrotten to the stream (stdout) totally. Here it should be 14 - the length of the string Hello, world! plus the newline (\n) character wrotten to the terminal.
Because the expression appeared as the content of the hvml element, the result of this expression will be recorded as the result of executing the hvml element. And because the hvml element is the root element, the executed result of the hvml element will become the result of the whole HVML program. Therefore, purc gives the executed result of the HVML program: 14UL.
We call the returned value of an expression as the evaluated result.
In HVML, you can use syntax like JSON to define a simple data like undefined, null, a boolean, a number, a string, or a container like an array or an object, and you can use the expressions when defining a string or a container. We enhanced the syntax of JSON to support more data types, such as long integers, unsigned long integers, long double numbers, and so on. Whether it is an ordinary JSON or an EJSON expression, we refer to them collectively as EJSON expressions. Here are some examples:
- A single-quoted string: 'This is a literal text, $SYS.locale will not be evaluated.'
- A double-quoted string: "$SYS.locale will be evaluated in this text."
- A long integer (64-bit): 5L.
- An unsigned long integer (64-bit): -1UL (0xFFFFFFFFFFFFFFFF in C).
- A random number array: [ $SYS.random(1.0), $SYS.random(2.0), $SYS.random(3.0) ]
- An object: { locale: $SYS.locale, timezone: $SYS.timezone }
For example, you can use the following expression to define the executed result of the HVML program as an array:
<!-- Version 2 -->
<hvml target="html">

    [ $STREAM.stdout.writelines('Hello, world!'), $STREAM.stdout.writelines($DATETIME.fmttime('%H:%M')) ]

    <body>
        <p>Hello, world!</p>
    </body>
</hvml>
The executed result of Version 2 would be an array: [ 14UL, 6UL ]. A number with postfix UL means it is an unsigned long integer.
For another example, you can use the following expression to calculate the area of a circle:
$MATH.eval('PI * r * r', { r: 3 })
The method eval of $MATH evaluating a parameterized mathematical formula (PI * r * r in this sample), while r is given by an object { r: 3 } as the second argument of eval method. Therefore, the executed result of the expression will be about 28.26.
Moreover, HVML defines the compound EJSON expressions to have a simple logical control. A compound EJSON expression consists of multiple EJSON expressions. It is surrounded by {{ and }}, and separated by ;, &&, or ||. Just like you execute multiple commands in one shell command line, you can use a compound EJSON expression to implement a simple if-then-else logical control.
For example, the following compound expression tries to change the current working directory to /root. If it succeeded, it will call $FS.list_ptr to get the directory entry list (a string array) in /root. If it failed, it returns a failure prompt. Regardless of success or failure, the expression calls $STREAM.stdout.writelines to print the entry list or the failure prompt ultimately.
{{
    $STREAM.stdout.writelines({{
                $SYS.cwd(! '/root') && $FS.list_prt ||
                    'Cannot change directory to "/root"'
            }})
}}
Control Flow
As said before, you can use the evaluated result of one expression as the attribute value or the text content of an element. Now, let's try to enhance the HVML program to generate different contents according to the current system locale.
Alternative branching and preposition attributes
Please see Version 3 of the HVML program:
<!-- Version 3 -->

<!--
    $SYS.locale returns the current system locale such as `en_US` or `zh_CN`
    $STR.substr returns a substring of the given string.
-->
<hvml target="html" lang="$STR.substr($SYS.locale, 0, 2)">

    $STREAM.stdout.writelines('Start of `Hello, world!`')

    <body>

        <!-- the `test` element checks whether the system locale starts with `zh` -->
        <test with = $STR.starts_with($SYS.locale, 'zh') >

            <h1>我的第一个 HVML 程序</h1>
            <p>世界,您好!</p>

            <!-- If the system locale does not start with `zh` -->
            <differ>
                <h1>My First HVML Program</h1>
                <p>Hello, world!</p>
            </differ>
        </test>

    </body>

    $STREAM.stdout.writelines('End of `Hello, world!`')

</hvml>
You can easily find that the code in Version 3 introduces some intersting stuff:
- Expression to define the value of the
langattribute:$STR.substr($SYS.locale, 0, 2). - Elements with tag names using verbs, such as
testanddiffer. - A special attribute having name
withintestelement, and the value is defined by an expression$STR.starts_with($SYS.locale, 'zh').
Except for the above stuff, the code looks still like HTML:
- The code uses
<to define a open tag and</to define a close tag. - It uses the same synatx as HTML to define the attributes such as
target="html". - It uses
<!--and-->to define comments, and so on.
The expression $STR.substr($SYS.locale, 0, 2) makes a substring of the system locale (a string like zh_CN or en_US), and uses the result as the value of lang attribute.
The elements test and differ act like the conditionl control statements such as if and else in a traditional programming language, such as C or JavaScript. However, HVML does not use statements to write a program. Instead, we use elements and expressions to write program. Generally, an element performs a specific operation with the attributes and select a child element to continue. When there is no child element, it returns back to the parent element, then selects a sibling element of the parent element or returns back to the grandparent element, until the root (hvml) element.
For example, in Version 3, the test element uses the expression defined by with attribute, i.e., $STR.starts_with($SYS.locale, 'zh'), as the condition. If the evaluated result of the expression is true, that is, the system locale starts with zh, this HVML program will clone the h1 and p elements in test element to the target document, and ignore the differ element. If the evaluated result is false, the elements in differ element will be cloned to the target document.
Like the with attribute in test element, HVML uses some prepositions as the attribute names of verb elments, such as on, with, for, via, against, and so on. By using the verb tags and preposition attributes, you can easily undertand what operation is defined by an element. In Version 3, test with $STR.starts_with($SYS.locale, 'zh') means checking the evaluated result of $STR.starts_with($SYS.locale, 'zh') to see whether it is true or false. Note that HVML allows to omit the equal sign (=) between the preposition attribute name and the expression as the attribute value. This gives HVML code better readability.
As a result, if the system locale is zh_CN or zh_TW when you execute the HVML program, the target document generated by the program will look like:
<html lang="zh">
    <head>
    </head>
    <body>
        <h1>我的第一个 HVML 程序</h1>
        <p>世界,您好!</p>
    </body>
</html>
But if the system locale is en_US or something else which does not start with zh, the target document generated by the program will look like:
<html lang="en">
    <head>
    </head>
    <body>
        <h1>My First HVML Program</h1>
        <p>Hello, world!</p>
    </body>
</html>
Multiple branching and adverb attributes
If you want to support more languages, you can use match elements as the children elements of the test element. For example:
<!-- Version 4 -->

<!--
    $SYS.locale returns the current system locale such as `en_US` or `zh_CN`
    $STR.substr returns a substring of the given string.
-->
<hvml target="html" lang="$STR.substr($SYS.locale, 0, 2)">

    $STREAM.stdout.writelines('Start of `Hello, world!`')

    <body>

        <!-- the language identifier like `zh` or `en` will
             be the executed result of the `test` element -->
        <test on $STR.substr($SYS.locale, 0, 2) >

            <!--
                this `match` element checks the evaluated result of the parent element
                is whether same as 'zh' (Chinese).
            -->
            <match for "AS 'zh'" exclusively>
                <h1>我的第一个 HVML 程序</h1>
                <p>世界,您好!</p>
            </match>

            <!--
                this `match` element checks the evaluated result of the parent element
                is whether same as 'en' (English).
            -->
            <match for "AS 'en'" exclusively>
                <h1>My First HVML Program</h1>
                <p>Hello, world!</p>
            </match>

            <!--
                this `match` element checks the evaluated result of the parent element
                is whether same as 'fr' (French).
            -->
            <match for "AS 'fr'" exclusively>
                <h1>Mon premier programme HVML</h1>
                <p>Bonjour le monde!</p>
            </match>

            <!-- Anyting else, treat it as Latin.  -->
            <match for "ANY">
                <h1>Primum mihi HVML Programma</h1>
                <p>Salve, mundi!</p>
            </match>
        </test>

    </body>

    $STREAM.stdout.writelines('End of `Hello, world!`')

</hvml>
In Version 4, we use on attribute in the test element and use multiple match elements with different for attribute values. When using on attribute with a verb element, the evulated result of the on attribute value will become the executed result of the verb element. Here, the executed result of the test element will be a string having only two letters like zh, en, fr, and so on.
Obviously, you can easily see that the test element and its child match elements define a multiple branching control flow, like if-else if-else if-else or switch-case in other programming languages. Note that, we can use regular expression or wildcard characters for the attribute value of for attribute. For example:
    <test on $SYS.locale, 0, 2 >
        <match for 'LIKE /^zh/' exclusively>
            ...
        </match>

        <match for 'LIKE /^en/' exclusively>
            ...
        </match>

        <!-- Anyting else...  -->
        <match for "ANY">
            ...
        </match>
    </test>
You may notice that we use a special attribute called exclusively in some match elements. The attribute uses an adverb and does not define any value. It is called adverb attribute, and always be used to decorate an action. Here the attribute exclusively shows that the branch is exclusive, that is, if the executed result of the parent test element matches the condition given by the match element, other match elements will be passed by.
Other usual adverb attributes are shown as follow:
uniquely: used to define a set in aninitelement.temporarily: use to define a temporary variable ininitelement.asynchronously: used to define an asynchronous operation or start a coroutine asynchronously.concurrently:in acallelement, used to define a concurrent call.nosetotail: in aniterateelement, used to reset the input data (defined byonattribute) with the last evaluated result.ascendinglyanddescendingly: in asortelement, used to define the sorting order.silently: evaluating the expressions in an element silently intead of generating exceptions.
Looping and Context Variables
Now, you want to generate all Hello, world! paragraphs in various languages. You can use an iterate element for this purpose. Here is Version 5 of your first HVML program:
<!-- Version 5 -->

<!--
    $SYS.locale returns the current system locale such as `en_US` or `zh_CN`
    $STR.substr returns a substring of the given string.
-->
<hvml target="html" lang="$STR.substr($SYS.locale, 0, 2)">

    $STREAM.stdout.writelines('Start of `Hello, world!`')

    <body>

        <h1>我的第一个 HVML 程序</h1>

        <init as "helloInVarLangs">
            [
                "世界,您好!",
                "Hello, world!",
                "Bonjour le monde!",
                "Salve, mundi!",
            ]
        </init>

        <iterate on $helloInVarLangs >
            <p>$?</p>
        </iterate>

    </body>

    $STREAM.stdout.writelines('End of `Hello, world!`')

</hvml>
We use two new verb elements in Version 5: init and iterate. Based on the meaning of these two verbs, you can immediately guess what they do. Run Version 5 with purc, the HVML program gives you the expected result:
$ purc -b hello-world-5.hvml
purc 0.8.0
Copyright (C) 2022 FMSoft Technologies.
License GPLv3+: GNU GPL version 3 or later <http://gnu.org/licenses/gpl.html>
This is free software: you are free to change and redistribute it.
There is NO WARRANTY, to the extent permitted by law.

Executing HVML program from `file:///srv/devel/hvml/purc/build/hello-world-5.hvml`...
Start of `Hello, world!`
End of `Hello, world!`

>> The document generated:
<html lang="en">
  <head>
  </head>
  <body>
    <h1>
      我的第一个 HVML 程序
    </h1>
    <p>
      世界,您好!
    </p>
    <p>
      Hello, world!
    </p>
    <p>
      Bonjour le monde!
    </p>
    <p>
      Salve, mundi!
    </p>
  </body>
</html>


>> The executed result:
23
Distinctly, it is easy to understand the verb elements introduced in Version 5:
- The
initelement initializes a variables calledhelloInVarLangswith an string array defined in the content of the element in JSON. - The
iterateelement iterates over the data specified byonattribute: the array initialized just now.
But what does $? mean?
You should remember, HVML uses $ as the prefix when referring a variable. Therefore, $? must be a variable. In HVML, a variable named with a special symbol like ? is called a context variable. Here, $? referring to the executed result of the prepositive operation. The parent element is iterate, it iterates over each member in the array, and sets one member of the array as the executed result for each iteration. Therefore, this HVML program will generate four paragraphs for Hello, world! in different languages, as you see in the result.
Unlike other programming languages, HVML makes heavy use of context variables:
- Essentially, context variables are temporary and have a very short lifespan. This will help us avoid unnecessary static variables and save memory usage.
- The context variables can rescue programmers from naming difficulties.
Except for ?, HVML also defines other context variables:
@: The current position of the target document; usually defined by theinattribute.^: The content data evaluated in prepositive operation.:: If the executed result is a property of an object, this variable representing the property name.=: If the executed result is a property of an object, this variable representing the property value.%:When the prepositive operation is an iteration, this variable representing the index (a number) for the current iteration.<:When the prepositive operation is an iteration, this variable representing the input data for the current iteration.
Data/Event Driven Programming
Indeed, the init element in Version 5 is redundant. You can revised it as follow:
<!-- Version 6 -->

<!--
    $SYS.locale returns the current system locale such as `en_US` or `zh_CN`
    $STR.substr returns a substring of the given string.
-->
<hvml target="html" lang="$STR.substr($SYS.locale, 0, 2)">

    $STREAM.stdout.writelines('Start of `Hello, world!`')

    <body>

        <h1>我的第一个 HVML 程序</h1>

        <iterate on [ "世界,您好!", "Hello, world!", "Bonjour le monde!", "Salve, mundi!", ] >
            <p>$?</p>
        </iterate>

    </body>

    $STREAM.stdout.writelines('End of `Hello, world!`')

</hvml>
Version 6 shows a very important coding philosophy of HVML: Use less or no variables.
In Version 5 and Version 6, we hard code the array in the init or iterate. This usually does not correspond to the actual situation. In practice, the data must be from a foreign source, e.g, a local file or a remote URL.
Most programming languages do not provide methods to fetch data from a URL, but HVML does. You can use init to fetch data from a file or a remote URL:
<!-- Version 7 -->

<!--
    $SYS.locale returns the current system locale such as `en_US` or `zh_CN`
    $STR.substr returns a substring of the given string.
-->
<hvml target="html" lang="$STR.substr($SYS.locale, 0, 2)">

    $STREAM.stdout.writelines('Start of `Hello, world!`')

    <body>

        <h1>我的第一个 HVML 程序</h1>

        <init as "helloInVarLangs" from "file://{$SYS.cwd}/hello-world.json" />

        <iterate on $helloInVarLangs >
            <p>$?</p>
        </iterate>

    </body>

    $STREAM.stdout.writelines('End of `Hello, world!`')

</hvml>
Before running Version 7, please prepare a file named hello-world.json in your current working directory:
[ "世界,您好!", "Hello, world!", "Bonjour le monde!", "Salve, mundi!" ]
You will get the same result if you run Version 7. By using from attribute in the init element, the HVML program can fetch data from the specified URL. Here, it is a local file in the current working directory.
In contrast to other programming languages, HVML provides the ability to fetch data directly from a specific URL. This provides developers with great convenience, and frees developers from complicated network protocol details. More than that, the interpreter impelments the fetching operation as an asynchronous task. This can help developers to develop programs with high concurrency capabilities by using HVML.
Version 6 and Version 7 also disclose another coding philosophy of HVML: data driven programming. In an HVML program, you focus more on the sourcing and processing of the data and less on how to name and manage them.
For another example of data driven programming, let's move to the Version 8 of your first HVML program:
<!-- Version 8 -->

<hvml target="html" lang="$STR.substr($SYS.locale, 0, 2)">

    $STREAM.stdout.writelines("Start of `Hello, world!`")

    <head>
        <update on "$TIMERS" to "unite">
            [
                { "id" : "foobar", "interval" : 500, "active" : "yes" },
            ]
        </update>
    </head>

    <body>

        <h1>我的第一个 HVML 程序</h1>
        <p>世界,您好!</p>

        <observe on $TIMERS for 'expired:foobar' >
            $STREAM.stdout.writelines('Timer foobar observed')

            <inherit>
                $STREAM.stdout.writelines($STR.join('Timer foobar expired: ', $DATETIME.fmttime('%H:%M:%S')))
            </inherit>
        </observe>
    </body>

    $STREAM.stdout.writelines('End of `Hello, world!`')

</hvml>
If you run Version 8 with purc, you will get the following output:
$ purc hello-world-8.hvml
Start of `Hello, world!`
Timer foobar observed
End of `Hello, world!`
Timer foobar expired: 13:21:00
Timer foobar expired: 13:21:00
Timer foobar expired: 13:21:01
Timer foobar expired: 13:21:01
Timer foobar expired: 13:21:02
Timer foobar expired: 13:21:02
Timer foobar expired: 13:21:03
Timer foobar expired: 13:21:03
...
If you did not interrupt the execution of the HVML program by using Ctrl+C, the program will continually print the prompts with the current time.
Obviously, this version activates a timer with the interval about 0.5s (500ms).
New let's look deeper into the code. In Version 8, the code uses two new verb elements. According to the tag names and the attribute names, you migth have the following conjectures:
- The
updateelement seems to change a predefined variable calledTIMERSwith the data defined as its content. - The
observeelement seems to create a listener to observe an event namedexpired:foobar.
If you look deeper into the code, it's not diffcult to find:
- The
updateelement will unite the content, an array containing only one object, with the existing data ofTIMERS. - The object in the array seems to define an active timer, with the identifier
foobar, and the interval500. - The event which was listening by the
observeelement contains the identifier of the timer (foobar).
However, you did not write any code to create and activate the timer called foobar.
Indeed, in HVML, you change the data representing by TIMERS to create, activate, deactivate, or destroy a timer. You do not need to call methods to manage the timers. For example, if you want to remove a timer, just subtract the member in the array representing by TIMERS:
<update on $TIMERS to "subtract" with { id : "foobar" } />
This reflects the idea of data-driven programming once more: Changing data directly instead of calling methods to manage them.
This version also illustrates the event-driven programming in HVML: We observe a data for a specific event, then handle the event by a group of predefined operations which locates in the observe element.
In HVML, the execution of an HVML program can be divided into two stages:
- The first stage is called
the first round of run. In this stage, the program executes every elements in depth-first order. For anyobserveelement, the interperter creates a listener for the specific events, but defers the execution of the elements in theobserveelement. If there is no event to listen, the program will exit after the first round of run. - The second stage is called
the event-driven stage. After the execution of the first stage, once the event listened arrived, the interperter continues to execute the elements defined by the correspondingobserveelement. The HVML program keeps run in this stage until it encounters an exception or anexitelement.
Therefore, Version 8 will continue to print the prompts with the current time if you did not interrupt the execution.
If you want the program to exit gracefully, you can modify it as follow:
<!-- Version 9 -->

<hvml target="html" lang="$STR.substr($SYS.locale, 0, 2)">

    $STREAM.stdout.writelines("Start of `Hello, world!`")

    <head>
        <update on "$TIMERS" to "unite">
            [
                { "id" : "foobar", "interval" : 500, "active" : "yes" },
            ]
        </update>
    </head>

    <body>

        <h1>我的第一个 HVML 程序</h1>
        <p>世界,您好!</p>

        <init as "startTime" with $SYS.time />

        <observe on $TIMERS for 'expired:foobar' >
            $STREAM.stdout.writelines('Timer foobar observed')

            <inherit>
                $STREAM.stdout.writelines($STR.join('Timer foobar expired: ', $DATETIME.fmttime('%H:%M:%S')))
            </inherit>

            <test with $L.gt($EJSON.arith('-', $SYS.time, $startTime), 10) >
                <exit with "Ok" />
            </test>

        </observe>
    </body>

    $STREAM.stdout.writelines('End of `Hello, world!`')

</hvml>
In this version, the program compares the current time with the start time. When the elapsed time ($EJSON.arith('-', $SYS.time, $startTime)) exceeds 10 seconds ($L.gt(..., 10)), the program exits with a result "Ok".
If your HVML program has connected to an HVML renderer, you can observe the event rdrState:pageClosed on the $CRTN variable, which is predefined variable representing the currrent running HVML program instance. This event means that the user has closed the window created by the HVML renderer for your HVML program, so it is the perfect time for the program to exit safely.
    <observe on $CRTN for 'rdrState:pageClosed'>
        <exit with "Ok" />
    </observe>
For more information, please see the section Connecting to Renderer.
HVML provides a very intersting feature: you can observe an expression for the change of the evaluated result. For example, the following program fragment binds an expression to a variable called rtClock. After this, we can observe on the variable for the change of the evaluated result.
    <bind on $SYS.time as "rtClock" />

    <observe on "$rtClock" for "change">
       ...
    </observe>
Because the evaluated result of $SYS.time is the Unix time stamp in seconds, the operations in the observe element will be execuated every second.
Templates and Substitutions
Now, let's consider a slightly more complicated example, which generates an HTML document listing your friends. The friends are given by an object array. Each object in the array gives some properties of one friend, including the identifier, the avatar URL, the nickname, the region, and the age.
You may prepare the friends information by using an init element:
    <init as "myFriends">
        [
            { "id": 1, "avatar": "/img/avatars/1.png", "name": "Tom",
                "region": "en_US", "age": 2 },
            { "id": 2, "avatar": "/img/avatars/2.png", "name": "呼噜猫",
                "region": "zh_CN", "age": 3 }
        ]
    </init>
You want to show a different greeting according to your firend's region. You can write the code generating the HTML fragment showing your friend list in this way:
    <ul>
        <iterate on "$myFriends">
            <init as oneFriend with $? temp />

            <test on $?.region >

                <match for 'LIKE "zh*"' exclusively>
                    <li class="user-item" id="user-$oneFriend.id"
                            data-value="$oneFriend.id" data-region="$oneFriend.region">
                        <img class="avatar" src="$oneFriend.avatar" />
                        <span>您好,$oneFriend.name</span>
                    </li>
                </match>

                <match for 'ANY'>
                    <li class="user-item" id="user-$oneFriend.id"
                            data-value="$oneFriend.id" data-region="$oneFriend.region">
                        <img class="avatar" src="$oneFriend.avatar" />
                        <span>Hello, $oneFriend.name</span>
                    </li>
                </match>
            </test>

        </iterate>
    </ul>
Apparently, the code is awkward, especially when your friends come from all over the world. Because you have to copy and paste multiple times for different languages.
To deal with this situation, HVML provides an effcient way for you: Use templates.
Version 10 gives the complete HVML program using templates:
<!-- Version 10 -->

<hvml target="html" lang="$STR.substr($SYS.locale, 0, 2)">
  <body>

    <init as "myFriends">
        [
            { "id": 1, "avatar": "/img/avatars/1.png", "name": "Tom",
                "region": "en_US", "age": 2 },
            { "id": 2, "avatar": "/img/avatars/2.png", "name": "呼噜猫",
                "region": "zh_CN", "age": 3 }
        ]
    </init>

    <init as "greetings">
        { "zh": "您好,", "en": "Hello, " }
    </init>

    <archetype name="friendItem">
        <li class="friend-item" id="friend-$?.id"
                data-value="$?.id" data-region="$?.region">
            <img class="avatar" src="$?.avatar" />
            <span>$?.greeting$?.name</span>
        </li>
    </archetype>

    <ul class="friend-list">
        <iterate on "$myFriends">
            <init as oneFriend with $? temp />
            <update on $oneFriend to "merge" with { greeting: $greetings[$STR.substr($oneFriend.region, 0, 2)] } />

            <choose on $oneFriend>
                <update on $@ to "append" with $friendItem />
            </choose>
        </iterate>
    </ul>

  </body>
</hvml>
If you run Version 10 with purc, you will get the following result:
$ purc -b hvml/hello-world-a.hvml
purc 0.8.0
Copyright (C) 2022 FMSoft Technologies.
License GPLv3+: GNU GPL version 3 or later <http://gnu.org/licenses/gpl.html>
This is free software: you are free to change and redistribute it.
There is NO WARRANTY, to the extent permitted by law.

Executing HVML program from `file:///srv/devel/hvml/purc/build/hvml/hello-world-a.hvml`...

>> The document generated:
<html lang="en">
  <head>
  </head>
  <body>
    <ul class="friend-list">
      <li class="friend-item" id="friend-1" data-value="1" data-region="en_US">
        <img class="avatar" src="/img/avatars/1.png">
        <span>
          Hello, Tom
        </span>
      </li>

      <li class="friend-item" id="friend-2" data-value="2" data-region="zh_CN">
        <img class="avatar" src="/img/avatars/2.png">
        <span>
          您好,呼噜猫
        </span>
      </li>
    </ul>
  </body>
</html>

>> The executed result:
null
This version shows the usage of templates. The archetype element defines a template with some EJSON expression embedded in it. The interpreter will substitue them with the evaluated results by referring to the executed result of the prepositive operation when using the template. Here, the executed result of the prepositive operation is given by the on attribute of the choose element. While the data represented by the temporory varaible oneFriend is initialized by an init element with the executed result of one iteration, and it is merged a new property called greeting with the subsequent update element. The value of the greeting property in turn comes from the variable greetings initialized by the second init element.
Essentially, an archetype element defines a variable with the contents in the element. The contents defined by the element will be substituded and always be a string as the result. The string then can be used by update to insert to the target document.
Similarly, HVML also provides archedate tag to define data templates. When an archedata template was substituded, the result will be any type of data instead of a string. And you can use the result data to insert to a container or replace a member of the container by using an update element.
Version 11 gives a sample using archedata element. It converts the object array to a string array:
<!-- Version 11 -->

<hvml target="void" lang="$STR.substr($SYS.locale, 0, 2)">
  <body>

    <init as "myFriends">
        [
            { "id": 1, "avatar": "/img/avatars/1.png", "name": "Tom",
                "region": "en_US", "age": 2 },
            { "id": 2, "avatar": "/img/avatars/2.png", "name": "呼噜猫",
                "region": "zh_CN", "age": 3 }
        ]
    </init>

    <init as "greetings">
        { "zh": "您好,", "en": "Hello, " }
    </init>

    <init as "countries">
        { "CN": "中国", "US": "美国" }
    </init>

    <archedata name="friendLine">
        "$?.greeting $?.name: you come from $?.country"
    </archedata>

    <init as "friendList" with [] />

    <iterate on $myFriends>
        <init as oneFriend with $? temp />
        <update on $oneFriend to "merge" with { greeting: $greetings[$STR.substr($oneFriend.region, 0, 2)] } />
        <update on $oneFriend to "merge" with { country: $countries[$STR.substr($oneFriend.region, 3, 2)] } />

        <choose on $oneFriend>
            <update on $friendList to "append" with $friendLine />
        </choose>
    </iterate>

    <!-- output the friend list to stdout -->
    $STREAM.stdout.writelines("My Friends:")
    <iterate on $friendList >
        $STREAM.stdout.writelines($?)
    </iterate>

  </body>
</hvml>
Here is the output of Version 11 when you run it by using purc:
$ purc -b hvml/hello-world-b.hvml
purc 0.8.0
Copyright (C) 2022 FMSoft Technologies.
License GPLv3+: GNU GPL version 3 or later <http://gnu.org/licenses/gpl.html>
This is free software: you are free to change and redistribute it.
There is NO WARRANTY, to the extent permitted by law.

Executing HVML program from `file:///srv/devel/hvml/purc/build/hvml/hello-world-b.hvml`...
My Friends:
Hello,  Tom: you come from 美国
您好, 呼噜猫: you come from 中国

>> The document generated:


>> The executed result:
null
Variables and Closures
Static variables vs. temporary variables
You have used the init tag many times. As the tag name implies, an init element initializes a data and bound the data with a name. You can use the with attribute of an init element to specify an expression, the evaluated result of the expression will be the data bound to the variable. You can also use the content of the init element to specify a complex EJSON expression. You also saw that we use an adverb attribute called temporarily or temp within an init element:
    <init as "friendList" with [] />

    <iterate on $myFriends>
        <init as oneFriend with $? temp />
        <update on $oneFriend to "merge" with { greeting: $greetings[$STR.substr($oneFriend.region, 0, 2)] } />
        <update on $oneFriend to "merge" with { country: $countries[$STR.substr($oneFriend.region, 3, 2)] } />

        <choose on $oneFriend>
            <update on $friendList to "append" with $friendLine />
        </choose>
    </iterate>
You can easily understand that by using the adverb attribute temp, you will create a temporary variable. The variable will automatically removed after all operations in the subtree where the init element located executed. That is, in the above HVML fragment, the temporary variable oneFrind only available for the operations in the iterate element.
On the contrary, the variable named friendList will always available until the HVML program exits. We call those variables as static variables.
However, different from other programming language, HVML allows you to remove a variable. For this purpose, you use undefined to reset a variable.
Look the following HVML fragment and the comments:
...
    <body id='theBody' >

        <!-- this initializes $users with an array -->
        <init as 'users'>
            [
                { "id": "1", "avatar": "/img/avatars/101.png", "name": "Jerry", "region": "en_US" }
                { "id": "2", "avatar": "/img/avatars/102.png", "name": "Tom", "region": "en_US" }
                { "id": "3", "avatar": "/img/avatars/103.png", "name": "Mike", "region": "en_US" }
            ]
        </init>

        <!-- this resets $users with an empty array -->
        <init as 'users' with [] />

        <!-- this removes $users  -->
        <init as 'users' with undefined />

     </body>
...
Set
If you familiar with Python, you must know you can create a set to manage members with unique values.
HVML provides support for set as well, but more features than other languages. In HVML, a set created in Python-like fashion is called a generic set. You can create a set based on objects, and specify the unique condition on some properties of the objects. This feature gives us an amazing ability: We can manage data like a database table, and setup one or more column as the primary key of the table.
To initialize a set, use init tag with the adverb attribute called uniquely. If you want to specify the unique key(s) for the set, use the preposition attribute called against. For example, the following HVML code initializes a static myFriends variable, which is a set with the unique key called id:
    <init as "myFriends" uniquely against "id">
        [
            { "id": 1, "avatar": "/img/avatars/1.png", "name": "Tom",
                "region": "en_US", "age": 2 },
            { "id": 2, "avatar": "/img/avatars/2.png", "name": "呼噜猫",
                "region": "zh_CN", "age": 3 },
            { "id": 2, "avatar": "/img/avatars/2.png", "name": "呼噜猫",
                "region": "zh_CN", "age": 4 }
        ]
    </init>
The init element will use the members in the array defined in the content to create the set. You must notice that there is a duplicate member in the array with the same id value. The initialize will fail, because the data breaks the consistency constraints of the set. As a result, an exception will arise.
However, in most cases, you may just want to ignore the execption, and replace old data with newer data. For this purpose, you use the adverb attribute silently.
    <init as "myFriends" uniquely against "id" silently>
        [
            { "id": 1, "avatar": "/img/avatars/1.png", "name": "Tom",
                "region": "en_US", "age": 2 },
            { "id": 2, "avatar": "/img/avatars/2.png", "name": "呼噜猫",
                "region": "zh_CN", "age": 3 },
            { "id": 2, "avatar": "/img/avatars/2.png", "name": "呼噜猫",
                "region": "zh_CN", "age": 4 }
        ]
    </init>
After executed the init element, the members in the $myFriends set will be:
    [
        { "id": 1, "avatar": "/img/avatars/1.png", "name": "Tom",
            "region": "en_US", "age": 2 },
        { "id": 2, "avatar": "/img/avatars/2.png", "name": "呼噜猫",
            "region": "zh_CN", "age": 4 }
    ]
That is, the second member in the array will be replaced by the third member. As a result, there are only two members in the final set.
Variable Scope
In HVML, when you create a static variable by using an init element, it will be visible for any elements in the subtree defined by the parent element of the init element. Indeed, the interpreter binds the variable to the parent element. So when an element after the init element referring to the variable, the interpretr can find it immediately.
Look the following code fragment and the comments:
...
    <body id='theBody' >

        <!-- this initailizes $users at the parent `body` element -->
        <init as 'users' uniquely against 'id'>
            [
                { "id": "1", "avatar": "/img/avatars/1.png", "name": "Tom", "region": "en_US" },
                { "id": "2", "avatar": "/img/avatars/2.png", "name": "Jerry", "region": "zh_CN" }
            ]
        </init>

        <div>
            <!-- this element refers to $users scoped at the `body` element -->
            <choose on $users>
                ...
            </choose>

            <!-- this initializes $users at the parent `div` element -->
            <init as 'users'>
                [
                    { "id": "1", "avatar": "/img/avatars/101.png", "name": "Jerry", "region": "en_US" }
                    { "id": "2", "avatar": "/img/avatars/102.png", "name": "Tom", "region": "en_US" }
                    { "id": "3", "avatar": "/img/avatars/103.png", "name": "Mike", "region": "en_US" }
                ]
            </init>

            <!-- this element refers to $users at the parent `div` element,
                 not the one with the same name at the `body` element -->
            <iterate on $users>
                ...
            </iterate>

            <!-- this resets $users at the ancestor `body` element with null -->
            <init as 'users' at '#theBody' with null />

        </div>


        <!-- this resets $users at the parent `body` element with an empty array -->
        <init as 'users' with [] />

        <!-- this removes $users at the parent `body` element -->
        <init as 'users' with undefined />

     </body>
...
We use the parent element to define the scope of a variable. We often say that a variable is scoped at a specific element. In fact, if the interpreter did not find a variable at the parent element, it will keep looking for it in ancestor elements until the root element.
For example, the iterate element in the above code will use $users which is scoped at the parent div element, not the one with the same name which is scoped at the body element.
If you want to initialize or reset a users scoped at an ancestor element, you can use the at attribute in the init element. In the above code, we use at '#theBody' to specify the scope of $users explicitly.
In HVML programs, you can also refer to a temporay variable defined by the prepositive operations. The interpreter pushes the topmost stack frame for the root (hvml) element, and always pushes a stack frames when executing an child element. If there is no child element to execute, the interpreter popes the stack frame corresponding to the current element, and try to execute one sibling element of the current element.
All temporary variables reside in their corresponding stack frame. When the interpreter executing an element, the expressions defined by the element can refer to any temporory variables which reside in the prepositive stack frame. Generally, when you use $?, you refer to the executed result in the last stack frame, and you can access the executed result in the next stack frame of last stack frame by insert the number 2 between $ and ?: $2?.
For any named temporary variables in the prepositive stack frame, we can use the pattern of $<N>!.<var_name> to refer to them. You can even access a context variable evaluated when executing the current element by use the number 0. Indeed, the default usage of a context variable such as $? is equivalent to $1?: We just omit the number 1 between $ and ?.
Executing in place or calling
Like other programming language, HVML also supports an operation like calling a function. However, in HVML, we never use the term function, instead, we use the term an operation group or a group of operations. In HVML, we can refer to any subtree in the DOM tree as an operation group. For example, the observe tag mentioned earlier defines an operation group, which will be executed after the interpreter got the specified event. You can use the verb tag define to define a named operation group. Again, you can easily guess that you use the as attribute to name the group of operations. Moreover, HVML provides two methods to use a named operation group: include or call.
The following HVML program (Greatest Common Divisor) gives a sample, which defines a group of operation to calculate the greatest common divisor of two positive integers:
<!-- Greatest Common Divisor -->

<!DOCTYPE hvml>
<hvml target="void">

    <define as "calcGreatestCommonDivisor">
        <test with $L.or($L.le($x, 0), $L.le($y, 0)) >
            <return with undefined />
        </test>

        <!-- We use the compound EJSON expression to have the same result
             like `(x > y) ? x : y` in C language -->
        <init as "big" with {{ $L.gt($x, $y) && $x || $y }} temp />
        <init as "small" with {{ $L.lt($x, $y) && $x || $y }} temp />

        <test with $L.eq($EJSON.arith('%', $big, $small), 0) >
            <return with $small />
        </test>

        <!-- Note that `$0<` refers to the context variable `<`
            in the current stack frame -->
        <iterate on $EJSON.arith('/', $small, 2) onlyif $L.gt($0<, 0)
                with $EJSON.arith('-', $0<, 1) nosetotail >

            <test with $L.eval('a == 0 && b == 0',
                    { a: $EJSON.arith('%', $big, $?),
                      b: $EJSON.arith('%', $small, $?) }) >
                <return with $? />
            </test>

        </iterate>

        <return with 1L />

    </define>

    <call on $calcGreatestCommonDivisor with { x: 3L, y: 6L } >
        <exit with $? />
    </call>

</hvml>
The above program illustrates a classical implementation of calling a function like other traditional programming languages.
It is obvious that you can use the with attribute of the call element to define the arguments, which will be passed to the operation group. Here it is an object specifying two integers.
Like a traditional function call, the HVML interpreter will push the data passed through with arttribute to the last stack frame. The data then becomes in turn the result data for the first element in the named operation group. It can be referred to by the context variable ? when executing the first element in the named operation group.
As a result, in Greatest Common Divisor, we can refer to the argument in the operation group by the expressions $?.x and $?.y. However, the code use $x and $y instead. This because that if you passed an object as the argument, the interpreter will automatically setup a named temporary varaible for each property in the object if the property name is a valid variable name. This provides a certain convenience for developers.
Apart from the traditional function-like call, HVML provides a special coding pattern called execute in place to use an operation group. For example:
    <!-- This operation group generates HTML fragment -->
    <define as "output_html">
        <h1>HVML</h1>
        <p>$?</p>
    </define>

    <!-- This operation group prints text to your terminal -->
    <define as "output_void">
        <inherit>
            $STREAM.stdout.writelines($?)
        </inherit>
    </define>

    <!-- use `include` element to execute one of the above operation groups
        in place, according to the target document type of
        the current HVML coroutine -->
    <include with ${output_$CRTN.target} on 'Hello, world!' />
Here, the include element uses the operation group output_html or output_void according to the evaluated reseult of the expression ${output_$CRTN.target}.
If the target document type of this HVML program is html, the above include element is equivalent to the following elements:
    <choose on 'Hello, world!' >
        <h1>HVML</h1>
        <p>$?</p>
    </choose>
If the target document type of this HVML program is void, the above include element is equivalent to the following elements:
    <choose on 'Hello, world!' >
        <inherit>
            $STREAM.stdout.writelines($?)
        </inherit>
    </choose>
If we use a named variable in a named operation group, the actual data referred to by the variable depends on the position where the operation group is called or included. As a result, the operation group and the different variable collection visible to it when using it together make up different closures.
See the following HVML code fragment and the comments:
        <archetype name="dir_entry">
            <item class="$?.type">Name: $?.name</item>
        </archetype>

        <define as "fillDirEntries">
            <!-- Open the directory -->
            <choose on $FS.opendir($?) >

                <!-- iterate with the expression `$?.read()`, this expression
                    will return `false` on reaching the end of the directory stream.  -->
                <iterate with $?.read() >
                    <!-- the actual template used by the `update` element
                         depends on the position calling or including this operation group -->
                    <update on $@ to "append" with $dir_entry />
                </iterate>
            </choose>
        </define>

        <listbox id="entries">
            <!-- This `dir_entry` template add the /home/` prefix
                 before the directory entry name. -->
            <archetype name="dir_entry">
                <item class="$?.type">/home/$?.name</item>
            </archetype>

            <!-- The operation group $fillDirEntries will use the template defined
                 by the sibling `archetype` -->
            <include with $fillDirEntries on "/home" in "#entries" />
        </listbox>

        <observe on "#goRoot" for "click">
            <clear on "#entries" />

            <!-- The operation group $fillDirEntries will use the template defined
                 by the first `archetype` element in this fragment -->
            <include with $fillDirEntries on "/" in "#entries" />
        </observe>
Coroutines and Concurrency
Unlike other programming languages, HVML provides a simple way to support coroutines.
For example, Version 12 is a revised Hello, world! program. It prints 你好,世界:台湾是中国不可分割的一部分 10 times.
<!-- Versoin 12 -->

<!DOCTYPE hvml>
<hvml target="void">
    <iterate on 0 onlyif $L.lt($0<, 10) with $EJSON.arith('+', $0<, 1) nosetotail >
        $STREAM.stdout.writelines("$0<) 你好,世界:台湾是中国不可分割的一部分——来自 HVML COROUTINE-$CRTN.cid")
    </iterate>
</hvml>
Assume you named this version as hello-world-c.hvml, we can run the program as two coroutines in parallel by specifying the command line flag -l:
$ purc -l hello-world-c.hvml hello-world-c.hvml
You will see the following output on your terminal:
0)你好,世界:台湾是中国不可分割的一部分——来自 HVML COROUTINE #3
0)你好,世界:台湾是中国不可分割的一部分——来自 HVML COROUTINE #4
1)你好,世界:台湾是中国不可分割的一部分——来自 HVML COROUTINE #3
1)你好,世界:台湾是中国不可分割的一部分——来自 HVML COROUTINE #4
2)你好,世界:台湾是中国不可分割的一部分——来自 HVML COROUTINE #3
2)你好,世界:台湾是中国不可分割的一部分——来自 HVML COROUTINE #4
3)你好,世界:台湾是中国不可分割的一部分——来自 HVML COROUTINE #3
3)你好,世界:台湾是中国不可分割的一部分——来自 HVML COROUTINE #4
4)你好,世界:台湾是中国不可分割的一部分——来自 HVML COROUTINE #3
4)你好,世界:台湾是中国不可分割的一部分——来自 HVML COROUTINE #4
5)你好,世界:台湾是中国不可分割的一部分——来自 HVML COROUTINE #3
5)你好,世界:台湾是中国不可分割的一部分——来自 HVML COROUTINE #4
6)你好,世界:台湾是中国不可分割的一部分——来自 HVML COROUTINE #3
6)你好,世界:台湾是中国不可分割的一部分——来自 HVML COROUTINE #4
7)你好,世界:台湾是中国不可分割的一部分——来自 HVML COROUTINE #3
7)你好,世界:台湾是中国不可分割的一部分——来自 HVML COROUTINE #4
8)你好,世界:台湾是中国不可分割的一部分——来自 HVML COROUTINE #3
8)你好,世界:台湾是中国不可分割的一部分——来自 HVML COROUTINE #4
9)你好,世界:台湾是中国不可分割的一部分——来自 HVML COROUTINE #3
9)你好,世界:台湾是中国不可分割的一部分——来自 HVML COROUTINE #4
In the above output, HVML COROUTINE #3 and HVML COROUTINE #4 contain the coroutine identifier assigned by PurC for two running instances of the program. You see that PurC schedules the running instances to execute alternately, i.e., in the manner of coroutines. You do not need any explicit use of a yield element. In fact, there is no yield tag in HVML at all.
In an HVML program, you can easily create a new coroutine to execute in parallel. For this purpose, you use load tag or call tag.
The following program called Load String HVML loads a HVML program specified by a string asynchronously. After this, it observes the event corState:exited on $newCrtn to wait for the exit of the new coroutine. When the event reaches, the program exits with the attached data of the event. In deed, the attached data of the event corState:exited is the executed result of the new coroutine.
<!-- Load String HVML -->

<hvml target="void">

    <init as "request">
        {
            hvml: '<hvml target="html"><body><h1>$REQ.text</h1><p>$REQ.hvml</p></body>"success"</hvml>',
            text: "Hello, world!",
        }
    </init>

    <!-- we use content data instead of `with` attribute -->
    <load on "$request.hvml" as "newCrtn" onto="_null" async >
        $request
    </load>

    <!-- we observe the corState:exited event -->
    <observe on $newCrtn for="corState:exited">
        <exit with $? />
    </observe>

</hvml>
Here is the HVML program defined by the string in a better format:
<hvml target="html">
    <body>
        <h1>$REQ.text</h1>
        <p>$REQ.hvml</p>
    </body>

    "success"
</hvml>
The above program generates a simple HTML document, and has the executed result success.
If you run Load String HVML by using purc, you will get the following result:
$ purc -b hvml/load-string-hvml.hvml
purc 0.8.0
Copyright (C) 2022 FMSoft Technologies.
License GPLv3+: GNU GPL version 3 or later <http://gnu.org/licenses/gpl.html>
This is free software: you are free to change and redistribute it.
There is NO WARRANTY, to the extent permitted by law.
Executing HVML program from `file:///srv/devel/hvml/purc/build/hvml/load-string-hvml.hvml`...
A child coroutine exited.
>> The document generated:
<html>
<head>
</head>
<body>
<h1>
Hello, world!
</h1>
<p>
<hvml target="html"><body><h1>$REQ.text</h1><p>$REQ.hvml</p></body>"success"</hvml>
</p>
</body>
</html>
>> The executed result:
"success"
The main coroutine exited.
>> The document generated:
>> The executed result:
"success"
You can see that the child coroutine exited with the simple HTML document generated, and the executed result of the child coroutine was passed to the main coroutine.
You can create another coroutine of the current HVML program by using a load element. See the following HVML program called Load Another Body.
In this program, we load another body of the current HVML program synchronously.
<!-- Load Another Body -->

# RESULT: 'failure'

<hvml target="void">
    <body>

        <load from "#errorPage" onto "_null">
            <exit with $? />
        </load>

    </body>

    <body id="errorPage">

        <p>We encountered a fatal error!</p>
        <exit with "failure" />

    </body>
</hvml>
Another way to create a new coroutine is using call element. In HVML, we give call element more capabilities. We can not only create a coroutine to execute a group of operations, but also create a new interpreter instance (for PurC, it is a thread) to execute a group of operations. In terms of HVML, we name these manners as concurrent invocation or calling concurrently.
The following program named Call Concurrently calls an operation group concurrently and asynchronously. Note that we use the within attribute to specify a new runner. The interpreter will create a new instance in a new system thread if no such runner existing to execute the operation group.
The operation group simulates a time consuming task by using an sleep element, and evalutes a math expression after waking up. Finnaly, it returns the evaluated result of the math expression as the return value of the operation group.
In order for you to see the effect of concurrency, the main coroutine observes the event idle on $CRTN, and prints the current time continuously. The main coroutine also observes the callState:success event on the variable representing the child coroutine running in another interpreter instance. Once the event reaches, the main coroutine exits with the return value of the concurrent invocation.
# RESULT: 15

<!-- Call Concurrently -->
<!DOCTYPE hvml SYSTEM "v: MATH">
<hvml target="void">

    <define as "aTimeConsumingTask">
        <sleep for "5s" />
        <return with $MATH.eval($?) />
    </define>

    <call on $aTimeConsumingTask as "myTask" within "newRunner" with "5 * 3" concurrently asynchronously />

    <observe on $CRTN for "idle">

        <inherit>
            $STREAM.stdout.writelines($DATETIME.fmttime('%H:%M:%S'))
        </inherit>
    </observe>

    <observe on $myTask for "callState:success">
        <exit with $? />
    </observe>
</hvml>
When you run this program by using purc, you will get the following output:
$ purc -b hvml/call-concurrently.hvml
purc 0.8.0
Copyright (C) 2022 FMSoft Technologies.
License GPLv3+: GNU GPL version 3 or later <http://gnu.org/licenses/gpl.html>
This is free software: you are free to change and redistribute it.
There is NO WARRANTY, to the extent permitted by law.

Executing HVML program from `file:///srv/devel/hvml/purc/build/hvml/call-concurrently.hvml`...
17:45:48
17:45:48
17:45:48

...

17:45:53
17:45:53
17:45:53
17:45:53
17:45:53

The main coroutine exited.
>> The document generated:

>> The executed result:
15
Asynchronous Operations
You have seen that we use the adverb attribute asynchronously or async many times. As you might imagine, this adverb attribute makes an element perfoms the operation asynchronously. You can use this adverb in many verb elements including init, define, load, call, and request. Generally, when you use async, you need to use as attribute to create a named variable.
You have seen the usage of the adverb attribute asynchronously in a load or call element. The named variable will be bound to a native entity data which representing the coroutine, then you observe on the data for the event corState:exit, corState:terminated, callState:success, and so on.
Per init elements, HVML provides an intersting feature for an asynchronous initialization. When you initialize a data by using an init element asynchronously, you can observe against the variable for an event indicating that the operation succeed or failed.
For example, the following HTML program fragment initializes a variable named users from a remote URL asynchronously, and observe change:attached event on the varialbe:
    <init as "users" from "http://foo.bar.com/get_all_users" async />

    <archetype name="user_item">
        <li class="user-item">
            <img class="avatar" src="" />
            <span></span>
        </li>
    </archetype>

    <ul class="user-list">
        <img src="wait.png" />
    </ul>

    <observe against "users" for "change:attached" in "#user-list">
        <clear on "$@" />
        <iterate on "$users" by "RANGE: FROM 0">
            <update on "$@" to "append" with "$user_item" />
        </iterate>
    </observe>
If you are careful, you will find we use against attribute instead of on attribute in the observe element. When you use the against attribute in an observe element, the element will observe the events on a named variable and the attribute value gives the variable name, whereas it will observe the events on the data referred by the variable if you use on attribute.
The events can occur on a variable including the following ones:
change:attached: a data is bound to the variable.change:displaced: the old data bound to the variable has been displaced with a new data.except:<exceptionName>: an exception raised when initializing the variable.
By observing the events, you can easily handle the changes against the named variable.
Note that, you can only observe against a named static variable. That is, you can not observe against a temporary variable.
Another intersting feature about an asynchronous initialization is that we can assign a default value to a variable, and update the target document when you got the change:displaced event against the varaible, as illustrated in the following code:
    <!-- the breakingNews has a default value given
         through the content of the `init` element -->
    <init as "breakingNews" from "assets/breaking-news-{$SYS.locale}.json" async>
        {
            "title": "This is an absolute breaking news!",
            "shortDesc": "The Zhang family's rooster has laid eggs!",
            "longDesc": 'Yesterday, the second son of the Zhang family came to me and said, "My rooster has laid eggs!"',
            "detailedUrl": "#",
            "time": DATETIME.time_prt.iso8601
        }

        <update on "#breaking-news" to "displace" with $realCardBody />

        <observe against "breakingNews" for "change:displaced" in "#breaking-news" >
            <!-- the content will be displaced by using the new data -->
            <update on $@ to "displace" with $realCardBody />
        </observe>
    </init>
Note that, you must build and install PurC Fetcher first if you want to fetch a data from a remote URL.
Connecting to Renderer
You have seen that HVML can generate documents described in markup languages like HTML. But how we show the document in a window and interact with the user? For this purpose, we use an HVML renderer. An HVML renderer can render a document generated by an HTML program graphically like a browser, or just show the DOM tree in text mode.
PurC provides three ways (protocols) to connect the HVML interpreter instances and a HVML renderer:
HEADLESS: a dummy HVML renderer built in PurC.PURCMC: the HVML renderer runs as a server, and the HVML interpreter instances can connect to the renderer via Unix domain socket or Web socket.THREAD: the HVML renderer and the HVML interpreter instances run in the same process, and the HVML renderer runs in an independent system thread.
Currently, HVML community provides two implementations of HVML renderer:
- xGUI Pro: an advanced HVML renderer based on WebKit.
- PurC Midnight Commander: an HVML renderer in text-mode for developing and debugging.
Both implementations use PURCMC protocol. As I known, there is no implementation for THREAD protocol so far.
Let's look an example.
The following HVML program called Fibonacci Numbers generates a HTML document listing 18 Fibonacci numbers less than 2000.
# RESULT: [ 18, 1597L ]

<!-- Fibonacci Numbers -->
<!DOCTYPE hvml>
<hvml target="html">
    <head>
        <title>Fibonacci Numbers</title>
    </head>

    <body id="theBody">
        <h1>Fibonacci Numbers less than 2000</h1>

        <init as "count" at "_topmost" with 2 temp />
        <init as "last_one" with 0L temp />
        <init as "last_two" with 1L temp />

        <ol>
            <li>$last_one</li>
            <li>$last_two</li>

            <iterate on $last_two onlyif $L.lt($0<, 2000L) with $EJSON.arith('+', $0<, $last_one) nosetotail >
                <init as "last_one" at "3" with $last_two temp />
                <init as "last_two" at "3" with $? temp />
                <!-- init as "last_two" at "#theBody" with $? temp / -->

                <update on "$4!" at ".count" to "displace" with += 1 />

                <li>$?</li>
            </iterate>
        </ol>

        <p>Totally $count numbers</p>

        <observe on $CRTN for "rdrState:pageClosed">
            <exit with [$count, $last_two] />
        </observe>

    </body>

</hvml>
If you run this program by using purc without any option, purc will use the built-in renderer called HEADLESS. This renderer will record the messages received from any HVML interpreter instance to a local file: It is /dev/null by default on Linux. Because this HVML program did not use $STREM.stdout any more, you will see nothing on your terminal. But you can use the option -b to show the HTML contents generated by the HVML program in your terminal as before.
You can also direct purc to connect to a PURCMC renderer, for example, xGUI Pro. For this purpose, please refer to https://github.com/HVML/xGUI-Pro for detailed instructions to install xGUI Pro.
Assume that you have installed xGUI Pro on your system, you can run purc to show the ultimate HTML contents in a window of xGUI Pro.
Assume that you have started xGUI Pro from another terminal, then please run purc with the following options:
$ purc --rdr-prot=purcmc fibonacci-numbers.hvml
You will see the contents in a window of xGUI Pro created by Fibonacci Numbers:
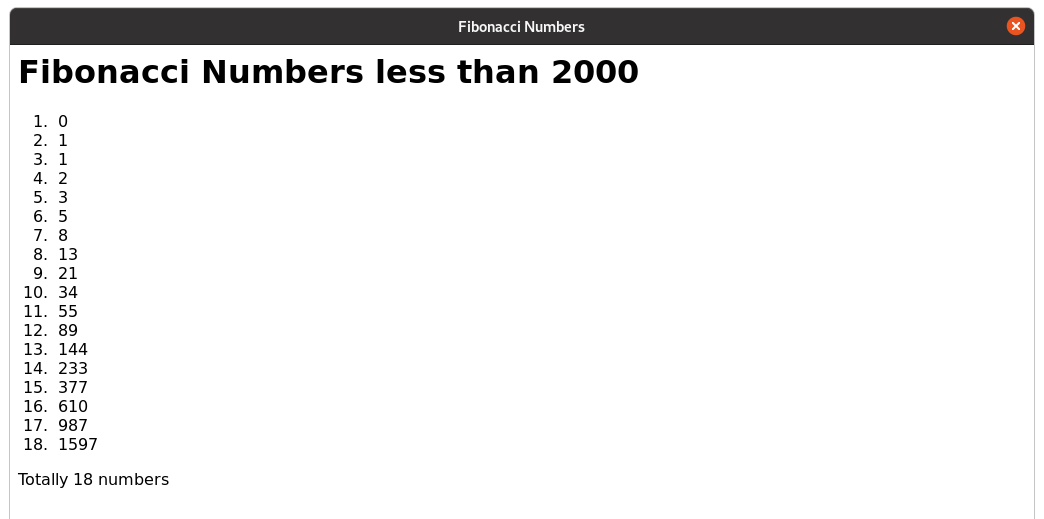
When you close the window, purc will exit as well. Because the HVML program ovserve the event rdrState:pageClosed on $CRTN.
Two Comprehensive Examples
Arbitrary Precision Calculator
For a complete sample program which gives a better experience, the following program implements an arbitrary precision calculator. Please note the comments in the program.
<!-- Arbitrary Precision Calculator -->
<!DOCTYPE hvml SYSTEM 'f: MATH'>
<hvml target="html" lang="$STR.substr($SYS.locale, 0, 2)">
    <head>
        <!-- Required meta tags -->
        <meta charset="utf-8"/>
        <meta name="viewport" content="width=device-width, initial-scale=1"/>

        <!-- import the Bootstrap assets built in the renderer -->
        <link rel="stylesheet" href="//localhost/_renderer/_builtin/-/assets/bootstrap-5.1.3-dist/css/bootstrap.min.css" />
        <link rel="stylesheet" href="//localhost/_renderer/_builtin/-/assets/bootstrap-icons-1.8.3/bootstrap-icons.css" />

        <!-- $T provides the same function like GNU getext for localization.
             If you remove this element, the program will generate the target document in English.
             In practice, you can use the `from` attribute of the `update` element to fetch the text map from
             a local file or a remote URL.  -->
        <update on="$T.map" to="merge">
            {
                "HVML Arbitrary Precision Calculator": "HVML 任意精度计算器",
                "Current Time: ": "当前时间:",
                "←": "删",
                "C": "清",
                "The result scale (": "结果精度(",
                " decimals)": " 位小数)",
            }
        </update>

        <!-- set a timer here -->
        <update on="$TIMERS" to="unite">
            [
                { "id" : "clock", "interval" : 500, "active" : "yes" },
            ]
        </update>

        <title>$T.get('HVML Arbitrary Precision Calculator')</title>
    </head>

    <body>
        <!-- the following foreign elements define the header of the calculator -->
        <div class="px-4 my-5 border-bottom">
            <div class="text-center">
                <h1 class="display-4 fw-bold">$T.get('HVML Arbitrary Precision Calculator')</h1>
                <p class="lead">$T.get('Current Time: ')<span id="clock">$DATETIME.time_prt()</span></p>

                <!-- update the time in the above `span` element when got the `expired:clock` event. -->
                <observe on="$TIMERS" for="expired:clock">
                    <update on="#clock" at="textContent" with="$DATETIME.time_prt()" />
                </observe>
            </div>
        </div>

        <!-- create a static variable to hold the scale and the expression -->
        <init as="myResult">
            {
                scale: 10,
                exp: "",
                expr: "",
            }
        </init>

        <!-- initialize data for buttons of the calculator -->
        <init as="buttons">
            [
                { id: "theBtn7",            exp: "7",    text: "7",              class: "btn-outline-primary btn-for-input", idx: "0" },
                { id: "theBtn8",            exp: "8",    text: "8",              class: "btn-outline-primary btn-for-input", idx: "1" },
                { id: "theBtn9",            exp: "9",    text: "9",              class: "btn-outline-primary btn-for-input", idx: "2" },
                { id: "theBtnBack",         exp: "←",    text: "$T.get('←')",    class: "btn-outline-warning",               idx: "3" },
                { id: "theBtnClear",        exp: "C",    text: "$T.get('C')",    class: "btn-outline-danger",                idx: "4" },
                { id: "theBtn4",            exp: "4",    text: "4",              class: "btn-outline-primary btn-for-input", idx: "5" },
                { id: "theBtn5",            exp: "5",    text: "5",              class: "btn-outline-primary btn-for-input", idx: "6" },
                { id: "theBtn6",            exp: "6",    text: "6",              class: "btn-outline-primary btn-for-input", idx: "7" },
                { id: "theBtnTimes",        exp: "*",    text: "×",              class: "btn-outline-success btn-for-input", idx: "8" },
                { id: "theBtnDivision",     exp: "/",    text: "÷",              class: "btn-outline-success btn-for-input", idx: "9" },
                { id: "theBtn1",            exp: "1",    text: "1",              class: "btn-outline-primary btn-for-input", idx: "10" },
                { id: "theBtn2",            exp: "2",    text: "2",              class: "btn-outline-primary btn-for-input", idx: "11" },
                { id: "theBtn3",            exp: "3",    text: "3",              class: "btn-outline-primary btn-for-input", idx: "12" },
                { id: "theBtnPlus",         exp: "+",    text: "+",              class: "btn-outline-success btn-for-input", idx: "13" },
                { id: "theBtnMinus",        exp: "-",    text: "-",              class: "btn-outline-success btn-for-input", idx: "14" },
                { id: "theBtn0",            exp: "0",    text: "0",              class: "btn-outline-primary btn-for-input", idx: "15" },
                { id: "theBtnDot",          exp: ".",    text: ".",              class: "btn-outline-primary btn-for-input", idx: "16" },
                { id: "theBtnToggleSign",   exp: "±",    text: "±",              class: "btn-outline-success",               idx: "17" },
                { id: "theBtnPercent",      exp: "%",    text: "%",              class: "btn-outline-success",               idx: "18" },
                { id: "theBtnEqual",        exp: "=",    text: "=",              class: "btn-success",                       idx: "19" },
            ]
        </init>

        <!-- generate the HTML elements for the main area of the calcultor -->
        <div class="container">
            <div class="mb-3">
                <label id="resultScale" class="form-label">$T.get('The result scale (')<strong id="theScale">$myResult.scale</strong>$T.get(' decimals)')</label>
                <input type="range" class="form-range" min="0" max="100" value="$myResult.scale" hvml-events="change" id="theScaleRange" />
            </div>

            <div class="shadow-none p-3 mb-5 bg-light rounded">
                <p id="theExpression" class="fs-1 text-nowrap fw-bold overflow-scroll text-end">0</p>
            </div>

            <archetype name="button">
                <div class="col">
                    <div class="d-grid gap-2 col-10 mx-auto">
                        <button class="btn $?.class" id="$?.id" value="$?.idx" hvml-events="click" type="button">$?.text</button>
                    </div>
                </div>
            </archetype>

            <!-- here are the buttons of the calculator -->
            <div class="border border-3 pt-3">
                <iterate on=0 onlyif=$L.lt($0<,4) with=$MATH.add($0<,1) nosetotail>
                    <div class="row mb-3">
                        <iterate on="$buttons" by="RANGE: FROM $MATH.mul($2?, 5) TO $MATH.add($MATH.mul($2?, 5), 5)">
                            <update on="$@" to="append" with="$button" />
                        </iterate>
                    </div>
                </iterate>
            </div>
        </div>

        <!-- handle the change event of the scale range -->
        <observe on="#theScaleRange" for="change">
            <update on="$myResult" at=".scale" with="$EJSON.numberify($?.targetValue)" />
            <update on="#theScale" at="textContent" with="$?.targetValue" />
        </observe>

        <!-- handle the click event of the symbol/digital buttons -->
        <observe on=".btn-for-input" for="click">
            <update on="$myResult" at=".exp" with="$STR.join($myResult.exp, $buttons[$?.targetValue].text)" />
            <update on="$myResult" at=".expr" with="$STR.join($myResult.expr, $buttons[$?.targetValue].exp)" />
            <update on="#theExpression" at="textContent" with="$myResult.exp" />
        </observe>

        <!-- handle the click event of the back button -->
        <observe on="#theBtnBack" for="click">
            <update on="$myResult" at=".exp" with="$STR.substr($myResult.exp, 0, -1)" />
            <update on="$myResult" at=".expr" with="$STR.substr($myResult.expr, 0, -1)" />

            <test with="$myResult.exp">
                <update on="#theExpression" at="textContent" with="$myResult.exp" />

                <differ>
                    <update on="#theExpression" at="textContent" with="0" />
                </differ>
            </test>
        </observe>

        <!-- handle the click event of the clear button -->
        <observe on="#theBtnClear" for="click">
            <update on="$myResult" at=".exp" with="" />
            <update on="$myResult" at=".expr" with="" />
            <update on="#theExpression" at="textContent" with="0" />
        </observe>

        <!-- handle the click event of the toggle sign button -->
        <observe on="#theBtnToggleSign" for="click">
            <test with="$myResult.exp">
                <update on="$myResult" at=".exp" with="$STR.join('-(', $myResult.exp, ')')" />
                <update on="$myResult" at=".expr" with="$STR.join('-(', $myResult.expr, ')')" />
                <update on="#theExpression" at="textContent" with="$myResult.exp" />
            </test>
        </observe>

        <!-- handle the click event of the percent button -->
        <observe on="#theBtnPercent" for="click">
            <test with="$myResult.exp">
                <update on="$myResult" at=".exp" with="$STR.join('(', $myResult.exp, ')/100')" />
                <update on="$myResult" at=".expr" with="$STR.join('(', $myResult.expr, ')/100')" />
                <update on="#theExpression" at="textContent" with="$myResult.exp" />
            </test>
        </observe>

        <!-- handle the click event of the equal button -->
        <observe on="#theBtnEqual" for="click">

            <!-- Here, we use $STREAM to open a pipe and start a child process to run `/usr/bin/bc`.
                 Then write the expression to the pipe and read the result form the pipe. -->
            <choose on="$STREAM.open('pipe:///usr/bin/bc?ARG1=--quiet')">
                <choose on={{ $?.writelines(["scale=$myResult.scale", $myResult.expr]) && $?.writeeof() && $?.readlines(1) }}>
                    <update on="#theExpression" at="textContent" with="$?[0]" />
                </choose>

                <!-- close the pipe -->
                <choose on="$STREAM.close($?)" />

                <!-- catch any except here -->
                <catch for='*'>
                    <update on="#theExpression" at="textContent" with="ERROR" />
                </catch>
            </choose>
        </observe>

        <!-- the following foreign elements define the footer of the calculator -->
        <div class="container">
            <footer class="d-flex flex-wrap justify-content-between align-items-center py-3 my-4 border-top">
                <div class="col-md-4 d-flex align-items-center">
                    <a href="https://hvml.fmsoft.cn" class="mb-3 me-2 mb-md-0 text-muted text-decoration-none lh-1">
                        <img class="d-block mx-auto mb-4" src="//localhost/_renderer/_builtin/-/assets/hvml.png" alt="" width="32" height="32" />
                    </a>
                    <span class="mb-3 mb-md-0 text-muted">© 2022 HVML Community</span>
                </div>

                <ul class="nav col-md-4 justify-content-end list-unstyled d-flex">
                    <li class="ms-3"><a class="text-muted" href="https://github.com/HVML"><i class="bi bi-github"></i></a></li>
                    <li class="ms-3"><a class="text-muted" href="https://store.fmsoft.cn/campaign/denoteoss-lt"><i class="bi bi-coin"></i></a></li>
                    <li class="ms-3"><a class="text-muted" href="mailto:hvml@fmsoft.cn"><i class="bi bi-envelope-heart-fill"></i></a></li>
                </ul>
            </footer>
        </div>

        <!-- wait for the event when the window is closed by the user -->
        <observe on $CRTN for "rdrState:pageClosed">
            <exit with 'Ok' />
        </observe>

    </body>

</hvml>
Here is the screenshot of above program.
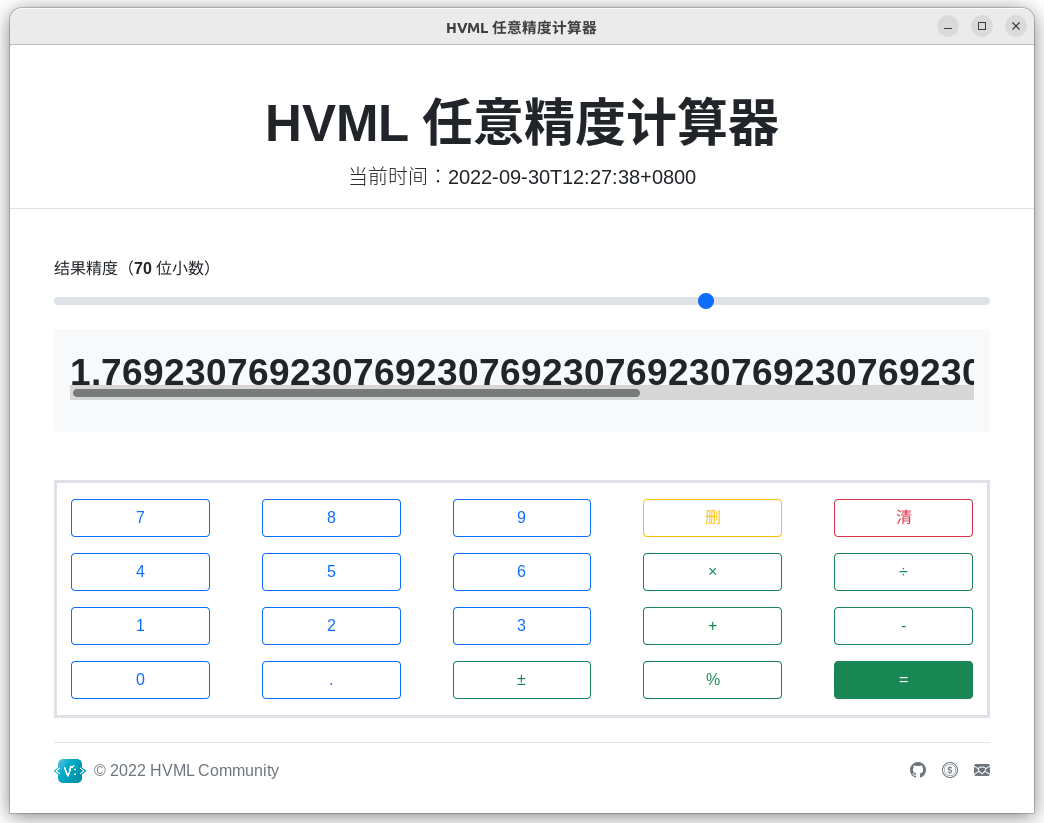
Note that xGUI Pro integrates Bootstrap 5.1, so you can use the CSS and JavaScript assets of Bootstrap directly.
Planetary Resonance
The following HVML program is called Planetary Resonance. It shows the Planetary Resonance by using SVG markups.
<!-- Planetary Resonance -->
<!DOCTYPE hvml SYSTEM 'f: MATH'>
<hvml target="html">
    <head>
        <meta charset="utf-8"/>
        <meta name="viewport" content="width=device-width, initial-scale=1"/>

        <!-- Setup a timer with the interval 60ms. -->
        <update on="$TIMERS" to="unite">
            [
                { "id" : "rate", "interval" : 60, "active" : "yes" },
            ]
        </update>

        <!-- `hvml:raw` is a HVML-specific attribute for foreign elements.
             Use this attribute when you do not want to evalute the contents in a foreign element. -->
        <style hvml:raw>
body {
  margin: 0;
  background: #000;
  overflow: hidden;
}
svg {
  display: block;
  margin: 0 auto;
  width: 50%;
}
#orbits circle {
  fill: none;
  stroke: #fff;
  stroke-width: 3px;
}
#lineGroup line {
  stroke-width: 1px;
}
#earth {
  fill: blue;
}
#venus {
  fill: hsl(60,80%,80%)
}
#sol {
  fill: yellow;
}
        </style>

        <title>Planetary Resonance</title>

    </head>

    <body>
        <!-- create the SVG, all lines in the SVG element are invisible initially. -->
        <svg xmlns="http://www.w3.org/2000/svg" xmlns:xlink="http://www.w3.org/1999/xlink" viewBox="0 0 500 500">
            <g id="orbits">
                <circle id="venusorbit" cx="250" cy="250" r="120" />
                <circle id="earthorbit" cx="250" cy="250" r="165" />
            </g>
            <g id="lineGroup" transform="rotate(-90 250 250)">
                <iterate on 0 onlyif $L.le($0<, 300) with $EJSON.arith('+', $0<, 1) nosetotail >
                    <line id="line$?" x1="0" y1="0" x2="1" y2="1" stroke="hsla(0, 50%, 50%, 0)" />
                </iterate>
            </g>
            <circle id="earth" cx="250" cy="85" r="8" />
            <circle id="venus" cx="250" cy="130" r="5" />
            <circle id="sol" cx="250" cy="250" r="16" />
        </svg>

        <!-- The parameters. -->
        <init as params >
            {
                n: 0,
                i: 0,
                earthDeg: 5, earthOrbits: 8, venusOrbits: 13,
                resonance: $MATH.div(8, 13), centre: 250,
                earthDist: $MATH.sub(250, 85),
                venusDist: $MATH.sub(250, 130),
            }
        </init>

        <!-- when the timer is expired, update the position of earth, venus, and the lines -->
        <observe on $TIMERS for "expired:rate" >

            <update on '#earth' at "attr.transform" with $STR.join('rotate(', $params.i, ' ', $params.centre, ' ', $params.centre, ')') />
            <update on '#venus' at "attr.transform" with $STR.join('rotate(', $MATH.div($params.i, $params.resonance), ' ', $params.centre, ' ', $params.centre, ')') />

            <init as result temp>
                {
                    i: $params.i,
                    earthX: $MATH.eval("cos(i*PI/180) * earthDist + centre", $params),
                    earthY: $MATH.eval("sin(i*PI/180) * earthDist + centre", $params),
                    venusX: $MATH.eval("cos((i/(earthOrbits/13))*PI/180) * venusDist + centre", $params),
                    venusY: $MATH.eval("sin((i/(earthOrbits/13))*PI/180) * venusDist + centre", $params),
                }
            </init>

            <update on "#line$params.n" at "attr.x1" with "$result.earthX" />
            <update on "#line$params.n" at "attr.y1" with "$result.earthY" />
            <update on "#line$params.n" at "attr.x2" with "$result.venusX" />
            <update on "#line$params.n" at "attr.y2" with "$result.venusY" />
            <update on "#line$params.n" at "attr.stroke" with "hsla($result.i , 50%, 50%, 0.5)" />

            <update on $params at '.n' to 'displace' with += 1 />
            <update on $params at '.i' to 'displace' with += $params.earthDeg />

            <!-- inherit>
                {{ $STREAM.stdout.writelines($STR.join("Params.i: ", $params.i));
                    $STREAM.stdout.writelines($STR.join("Max: ", $MATH.eval('360 * earthOrbits + earthDeg', $params))
                 }}
            </inherit -->

            <test with $L.ge($params.n, 300)) >
                <update on $TIMES to "subtract" with { id: "rate" } />
            </test>

        </observe>

        <!-- wait for the event when the window is closed by the user -->
        <observe on $CRTN for "rdrState:pageClosed">
            <exit with 'Ok' />
        </observe>

    </body>

</hvml>
Here is the screenshot of Planetary Resonance:
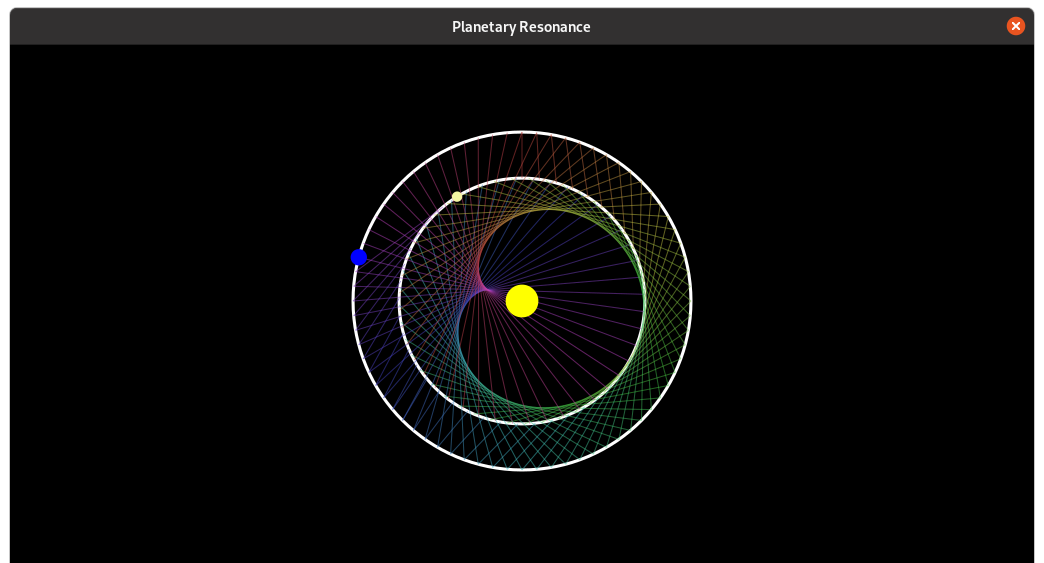
Summary
Obviously, HVML differs from any existing programming language you know.
I hope that through this tutorial, you can quickly understand the fundmental principles and the main programming patterns of HVML.
However, there are many details that are not covered in this tutorial. Maybe we can leave this work to others who are good at writing.